What Are Spider Curls?
Do you want to achieve bigger and wider biceps? If that’s what you’re aiming for, including spider curls in your workout routine won’t disappoint you!
Spider curls are known for producing effective results suited for people working on their arms.
Also known as an isolation exercise, it targets a specific muscle group on your brachii muscles that helps strengthen the upper part of your bicep, adding shape and definition.
So, if you’re curious about how to do spider curls and how it works on your body, read on. Spider curls exercise can make your arms look better than ever!
What Muscles Do Spider Curls Work?
If you want to work on spider curls, you must first know what it does to understand what you’re working on. Your biceps consists of two heads, i.e., the short and long, that combine and form a mass making your biceps appear firm and full.
Let us tell you how it works!
When you do spider curls, your arms are placed at the front, which targets the short head of your biceps, allowing it to do more work.
Doing this helps define your muscles because this arm positioning works exceptionally well in adding mass to your upper arm.
Working with arms on your sides prevents the short head from doing its job because the upper body muscles will do all the work, including the long head.
And to make your biceps look full and firm, you’ll have to make the lower part of your muscle do some heavy work.
Hence, keeping your arms at the front and isolating the short head muscle is essential to achieve bigger arms.
Besides increasing the size of your biceps, spider curls also help work on your elbow flexor muscle, making it easier for you to lift heavy dumbbells at the gym.

How Do You Do Spider Curls?
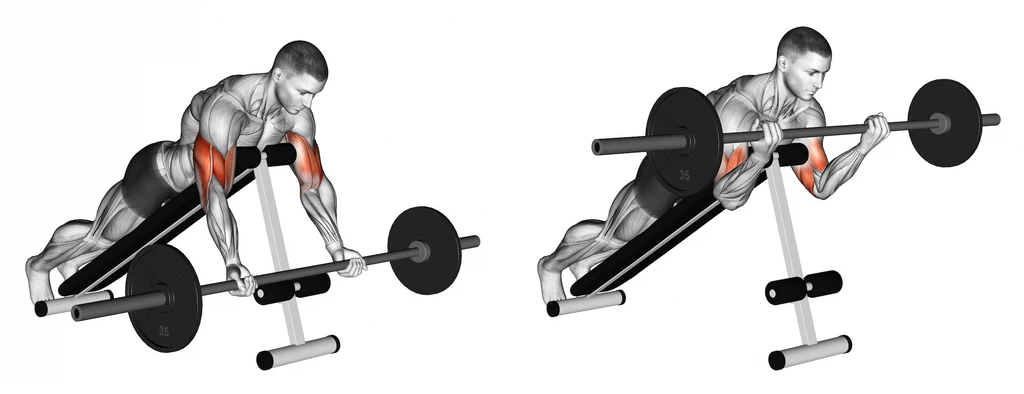
You’ll need a barbell and spider curl bench to start working on spider curls. Or you can also use an adjustable weight bench, dumbbells, and EZ-bar, whichever you’re most comfortable with.
Here’s a step-by-step method:
- Set the bench at 45 degrees.
- Now, adjust your position. Lean on the bench to support your chest and torso, and place your feet firmly on the floor.
- Your upper arms should be resting on the pad to allow free movement, and your chin should be tucked throughout the process.
- With your palms facing upwards, grab the barbell and lift it as high as possible, keeping your arms still.
- Without moving your arms, squeeze your biceps and push the barbell close to your shoulder, but they shouldn’t touch.
- Squeeze your biceps for a second or two before lowering your weights.
- Now, slowly straighten your arms back to their original position and pause before you start another rep.
Aim for at least 2 to 3 sets with 10 to 12 reps for maximum benefit. Ensure you pick a weight you can control throughout to maintain your posture. Or, if you struggle to control your body, try dropping the weight of your bell.
Don’t release too quickly when pausing to squeeze your biceps because there’s no rushing. Also, rest appropriately before training again, as your muscles need to recover.
Are Spider Curls Better Than Regular Curls?
Spider curls or isolation exercises are an excellent alternative to regular curls as they both share similarities targeting the same muscles, such as the biceps brachii and elbow flexor muscles.
These two types of exercises are equally challenging and yield similar results, but what makes them different is the way of exercising.
Spider curls are done by pressing your body’s weight on the bench. In contrast, regular curls are performed standing straight, or you can also perform sitting on a bench.
Both exercises help pump up your muscles by targeting your short head biceps and putting them under stress to get the work done.
Whether spider curls or regular curls, they both have sticking points. In spider curls, the most challenging point is when the biceps clench, whereas, in regular curls, the difficult part is when the arms are fully extended.
Since they’re variations of each other, if working in the same position for an extended period doesn’t add fun to your workout, you can always choose the other option.
However, when compared between the two, spider curls allow more joint movement.

Why Are Spider Curls So Hard?
Spider curls are challenging because it focuses only on a specific muscle group using the least weight, and there’s no cheating. Especially for beginners, it cannot be easy when both arms are in a vertical position.
Also, it goes strictly by the book. Your elbows shouldn’t move forward, nor can you move them. You have to maintain a firm position from start to end with a complete focus for effective results.
The trick is, locking in your arms and shoulders by taking advantage of the bench pad and allowing the lower arm to do the lifting.
During a workout, the lower part of the muscles is least paid attention to, and exercises like spider curls target those areas helping you achieve firm muscles.
The benefit is that stretching your arms puts enough tension on the muscles, which works great in adding mass to your biceps.
When working out, don’t start heavy because overdoing or ego-lifting can cause damage to your muscles. It’s best to choose a weight you can easily lift for 10 to 12 reps and gradually increase the weight.
Spider curls are one of the most effective ways to widen your biceps, as the sole purpose is focusing on the short head.
The steps are simple, and it’s relatively easy. So, incorporating spider curls into your workout routine can be rewarding if you aim to achieve defined muscles.
Moreover, there are other variations of spider curls, such as preacher curls, standing dumbbell preacher curls, and standing inner biceps curls.
So if you don’t feel like using the same method for several months, try choosing an alternative.


